[Fuente: http://www.javacodegeeks.com/2012/06/android-dashboard-design-pattern.html]
[audio http://wpcom.files.wordpress.com/2007/01/mattmullenweg-interview.mp3]
[youtube=http://www.youtube.com/watch?v=JaNH56Vpg-A&w=640&h=385]
[recently_posts]
En breve, diremos que un Dashboard es una página conteniendo símbolos claros y grandes para acceder a la funcionalidad principal y opcionalmente un área para información de noticias relevantes.
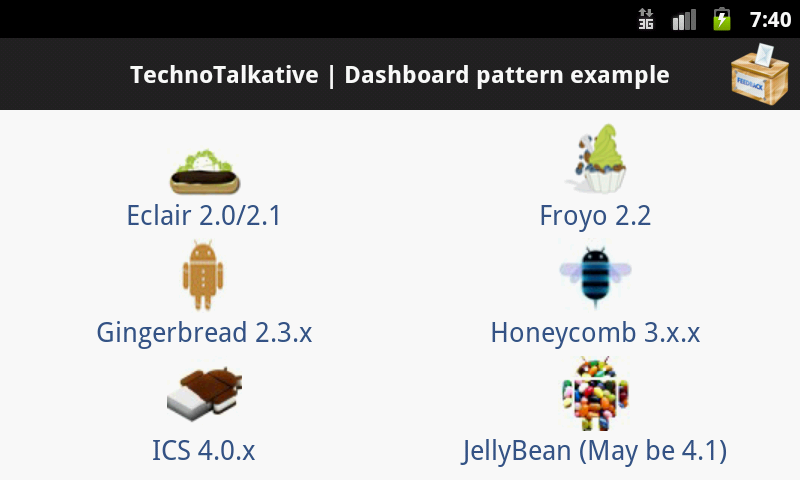
El principal objetivo de este artículo es implementar un patrón de diseño de Dashboard como el siguiente:
Paso 1: Crear el Title bar layout
Definiremos el layout de la title bar (header o cabecera) sólo una vez pero será requerida en varias pantallas. Mostraremos/ocultaremos el botón de Home y otros botones cuandoquiera que son necesitados. Una vez que has hecho el title bar layout, podemos utilizarlo el mismo layout en otros layouts utilizando ViewStub.
He aquí un ejemplo del (header) xml layout:
header.xml
<?xml version="1.0" encoding="utf-8"?>
	<RelativeLayout xmlns:android="http://schemas.android.com/apk/res/android"
	    android:layout_width="fill_parent"
	    android:layout_height="wrap_content"
	    android:background="@color/title_background" >

	    <LinearLayout
	        android:id="@+id/panelIconLeft"
	        android:layout_width="wrap_content"
	        android:layout_height="wrap_content"
	        android:layout_alignParentLeft="true"
	        android:layout_centerVertical="true"
	        android:layout_margin="5dp" >

	        <Button
	            android:id="@+id/btnHome"
	            android:layout_width="wrap_content"
	            android:layout_height="wrap_content"
	            android:background="@drawable/ic_home"
	            android:onClick="btnHomeClick" />
	    </LinearLayout>

	    <TextView
	        android:id="@+id/txtHeading"
	        style="@style/heading_text"
	        android:layout_width="fill_parent"
	        android:layout_height="wrap_content"
	        android:layout_centerInParent="true"
	        android:layout_marginLeft="5dp"
	        android:layout_marginRight="5dp"
	        android:layout_toLeftOf="@+id/panelIconRight"
	        android:layout_toRightOf="@id/panelIconLeft"
	        android:ellipsize="marquee"
	        android:focusable="true"
	        android:focusableInTouchMode="true"
	        android:gravity="center"
	        android:marqueeRepeatLimit="marquee_forever"
	        android:singleLine="true"
	        android:text=""
	        android:textColor="@android:color/white" />

	    <LinearLayout
	        android:id="@+id/panelIconRight"
	        android:layout_width="wrap_content"
	        android:layout_height="wrap_content"
	        android:layout_alignParentRight="true"
	        android:layout_centerVertical="true"
	        android:layout_margin="5dp" >

	        <Button
	            android:id="@+id/btnFeedback"
	            android:layout_width="wrap_content"
	            android:layout_height="wrap_content"
	            android:background="@drawable/ic_feedback"
	            android:onClick="btnFeedbackClick" />
	    </LinearLayout>

	</RelativeLayout>
El código de arriba hace referencias a estilos de styles.xml y dimensiones de dimen.xml:
styles.xml
<?xml version="1.0" encoding="utf-8"?>
	<resources>
	<style name="heading_text">
	        <item name="android:textColor">#ff000000</item>
	        <item name="android:textStyle">bold</item>
	        <item name="android:textSize">16sp</item>
	        <item name="android:padding">5dp</item>
	    </style>
	<style name="HomeButton">
	        <item name="android:layout_gravity">center_vertical</item>
	        <item name="android:layout_width">fill_parent</item>
	        <item name="android:layout_height">wrap_content</item>
	        <item name="android:layout_weight">1</item>
	        <item name="android:gravity">center_horizontal</item>
	        <item name="android:textSize">@dimen/text_size_medium</item>
	        <item name="android:textStyle">normal</item>
	        <item name="android:textColor">@color/foreground1</item>
	        <item name="android:background">@null</item>
	    </style>

	</resources>
dimen.xml
<?xml version="1.0" encoding="utf-8"?>
<resources>
    <dimen name="title_height">45dip</dimen>
    <dimen name="text_size_small">14sp</dimen>
    <dimen name="text_size_medium">18sp</dimen>
    <dimen name="text_size_large">22sp</dimen>
</resources>
Paso 2: Crea una super (abstract) class
De hecho, en esta abstract super class, definiremos:
1) event handlers para los dos botones : Home and Feedback
2) Otros métodos
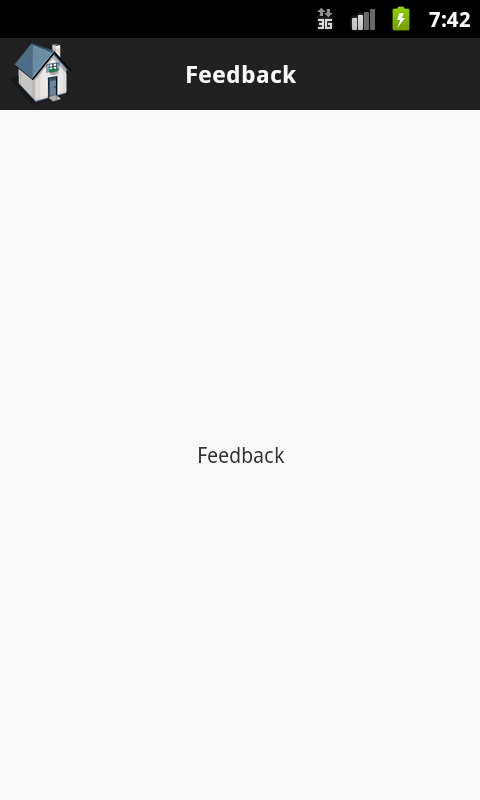
Los botones de Home y Feedback , que van a ser visibles en casi todas las activities y que requerirán las mismas acciones a ser realizadas (por ejemplo , llevar al usuario a la activity de Home). Así que en vez de escribir el mismo código en cada actividad, escribiremos un event handler sólo una vez en una clase abstracta que será superclase para todas las activities.
Puedes haberte dado cuenta en el fichero header.xml de donde están definidos los botones de Home y de Feedback:
android:onClick=”btnHomeClick” (Home button)
android:onClick=”btnFeedbackClick” (Feedback button)
, asi que definiremos este método una vez en la super clase (abstracta).
Por favor, buscate un ejemplo de ViewStub si nunca lo has utilizado.
Ahora , aquí está el código de la clase abstracta, la llamaremos DashboardActivity.java
package com.technotalkative.viewstubdemo;

	import android.app.Activity;
	import android.content.Intent;
	import android.os.Bundle;
	import android.view.View;
	import android.view.ViewStub;
	import android.widget.Button;
	import android.widget.TextView;

	public abstract class DashBoardActivity extends Activity {
	    /** Called when the activity is first created. */
	    @Override
	    public void onCreate(Bundle savedInstanceState) {
	        super.onCreate(savedInstanceState);
	    }

	    public void setHeader(String title, boolean btnHomeVisible, boolean btnFeedbackVisible)
	    {
	      ViewStub stub = (ViewStub) findViewById(R.id.vsHeader);
	      View inflated = stub.inflate();

	      TextView txtTitle = (TextView) inflated.findViewById(R.id.txtHeading);
	      txtTitle.setText(title);

	      Button btnHome = (Button) inflated.findViewById(R.id.btnHome);
	      if(!btnHomeVisible)
	       btnHome.setVisibility(View.INVISIBLE);

	      Button btnFeedback = (Button) inflated.findViewById(R.id.btnFeedback);
	      if(!btnFeedbackVisible)
	       btnFeedback.setVisibility(View.INVISIBLE);

	    }

	    /**
	     * Home button click handler
	     * @param v
	     */
	    public void btnHomeClick(View v)
	    {
	     Intent intent = new Intent(getApplicationContext(), HomeActivity.class);
	     intent.setFlags (Intent.FLAG_ACTIVITY_CLEAR_TOP);
	     startActivity(intent);

	    }

	    /**
	     * Feedback button click handler
	     * @param v
	     */
	    public void btnFeedbackClick(View v)
	    {
	     Intent intent = new Intent(getApplicationContext(), FeedbackActivity.class);
	     startActivity(intent);
	    }
	}
Step 3: Define Dashboard layout
01 |
<?xml version="1.0" encoding="utf-8"?> |
03 |
android:layout_width="fill_parent" |
04 |
android:layout_height="fill_parent" |
05 |
android:orientation="vertical" > |
11 |
android:id="@+id/vsHeader" |
12 |
android:layout_width="fill_parent" |
13 |
android:layout_height="wrap_content" |
14 |
android:inflatedId="@+id/header" |
15 |
android:layout="@layout/header" /> |
18 |
android:layout_width="fill_parent" |
19 |
android:layout_height="wrap_content" |
20 |
android:layout_weight="1" |
21 |
android:orientation="vertical" |
22 |
android:padding="6dip" > |
25 |
android:layout_width="fill_parent" |
26 |
android:layout_height="wrap_content" |
27 |
android:layout_weight="1" |
28 |
android:orientation="horizontal" > |
31 |
android:id="@+id/main_btn_eclair" |
32 |
style="@style/HomeButton" |
33 |
android:drawableTop="@drawable/android_eclair_logo" |
34 |
android:onClick="onButtonClicker" |
35 |
android:text="@string/EclairActivityTitle" /> |
38 |
android:id="@+id/main_btn_froyo" |
39 |
style="@style/HomeButton" |
40 |
android:drawableTop="@drawable/android__logo_froyo" |
41 |
android:onClick="onButtonClicker" |
42 |
android:text="@string/FroyoActivityTitle" /> |
46 |
android:layout_width="fill_parent" |
47 |
android:layout_height="wrap_content" |
48 |
android:layout_weight="1" |
49 |
android:orientation="horizontal" > |
52 |
android:id="@+id/main_btn_gingerbread" |
53 |
style="@style/HomeButton" |
54 |
android:drawableTop="@drawable/android_gingerbread_logo" |
55 |
android:onClick="onButtonClicker" |
56 |
android:text="@string/GingerbreadActivityTitle" /> |
59 |
android:id="@+id/main_btn_honeycomb" |
60 |
style="@style/HomeButton" |
61 |
android:drawableTop="@drawable/android_honeycomb_logo" |
62 |
android:onClick="onButtonClicker" |
63 |
android:text="@string/HoneycombActivityTitle" /> |
67 |
android:layout_width="fill_parent" |
68 |
android:layout_height="wrap_content" |
69 |
android:layout_weight="1" |
70 |
android:orientation="horizontal" > |
73 |
android:id="@+id/main_btn_ics" |
74 |
style="@style/HomeButton" |
75 |
android:drawableTop="@drawable/android_ics_logo" |
76 |
android:onClick="onButtonClicker" |
77 |
android:text="@string/ICSActivityTitle" /> |
80 |
android:id="@+id/main_btn_jellybean" |
81 |
style="@style/HomeButton" |
82 |
android:drawableTop="@drawable/android_jellybean_logo" |
83 |
android:onClick="onButtonClicker" |
84 |
android:text="@string/JellyBeanActivityTitle" /> |
Step 4: Define activity for handling this dashboard layout buttons click events.
In this activity, you will find the usage of setHeader() method to set the header for home activity, yes in this method i have passed “false” for home button because its already a home activity, but i have passed “true” for feedback button because feedback is needed to be visible. Other process are same as defining button click handlers.
01 |
package com.technotalkative.viewstubdemo; |
03 |
import android.content.Intent; |
04 |
import android.os.Bundle; |
05 |
import android.view.View; |
07 |
public class HomeActivity extends DashBoardActivity { |
08 |
/** Called when the activity is first created. */ |
10 |
public void onCreate(Bundle savedInstanceState) { |
11 |
super.onCreate(savedInstanceState); |
12 |
setContentView(R.layout.main); |
13 |
setHeader(getString(R.string.HomeActivityTitle), false, true); |
17 |
* Button click handler on Main activity |
20 |
public void onButtonClicker(View v) |
25 |
case R.id.main_btn_eclair: |
26 |
intent = new Intent(this, Activity_Eclair.class); |
27 |
startActivity(intent); |
30 |
case R.id.main_btn_froyo: |
31 |
intent = new Intent(this, Activity_Froyo.class); |
32 |
startActivity(intent); |
35 |
case R.id.main_btn_gingerbread: |
36 |
intent = new Intent(this, Activity_Gingerbread.class); |
37 |
startActivity(intent); |
40 |
case R.id.main_btn_honeycomb: |
41 |
intent = new Intent(this, Activity_Honeycomb.class); |
42 |
startActivity(intent); |
45 |
case R.id.main_btn_ics: |
46 |
intent = new Intent(this, Activity_ICS.class); |
47 |
startActivity(intent); |
50 |
case R.id.main_btn_jellybean: |
51 |
intent = new Intent(this, Activity_JellyBean.class); |
52 |
startActivity(intent); |
Step 5: Define other activities and their UI layouts
Now, its time to define activities that we want to display based on the particular button click from dashboard. So define every activities and their layouts. Don’t forget to call setHeader() method wherever necessary.
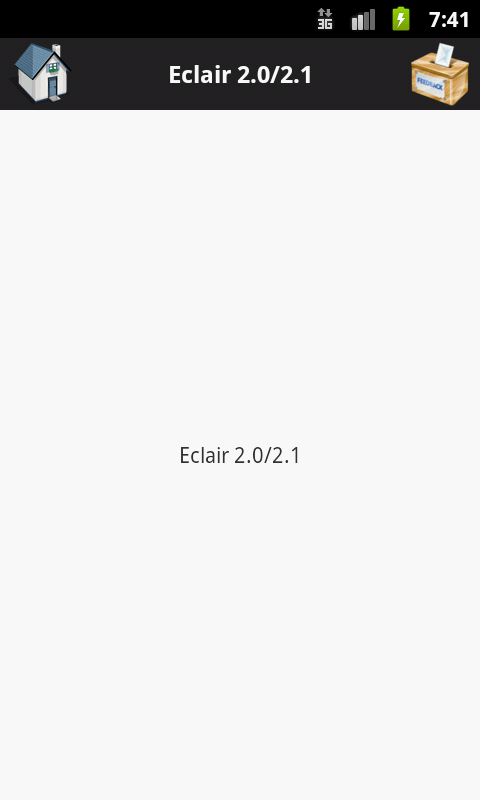
Here is one example for such activity – Activity_Eclair.java
01 |
package com.technotalkative.viewstubdemo; |
03 |
import android.os.Bundle; |
05 |
public class Activity_Eclair extends DashBoardActivity { |
06 |
/** Called when the activity is first created. */ |
08 |
public void onCreate(Bundle savedInstanceState) { |
09 |
super.onCreate(savedInstanceState); |
10 |
setContentView(R.layout.activity_eclair); |
11 |
setHeader(getString(R.string.EclairActivityTitle), true, true); |
activity_eclair.xml
01 |
<?xml version="1.0" encoding="utf-8"?> |
03 |
android:layout_width="fill_parent" |
04 |
android:layout_height="fill_parent" |
05 |
android:orientation="vertical" > |
11 |
android:id="@+id/vsHeader" |
12 |
android:layout_width="fill_parent" |
13 |
android:layout_height="wrap_content" |
14 |
android:inflatedId="@+id/header" |
15 |
android:layout="@layout/header" /> |
18 |
android:id="@+id/textView1" |
19 |
android:layout_width="match_parent" |
20 |
android:layout_height="match_parent" |
21 |
android:gravity="center" |
22 |
android:text="@string/EclairActivityTitle" /> |
Step 6: Declare activities inside the AnroidManifest.xml file
Now you are DONE 
Output:
 |
| Home screen _ Landscape |
 |
| inner screen |
You can download source code from here: Android – Dashboard pattern implementation
Feedback/review are always welcome
Reference: Android – Dashboard design pattern implementation from our JCG partner Paresh N. Mayani at the TechnoTalkative blog.


.png)