
[Fuente: https://vuex.vuejs.org/]
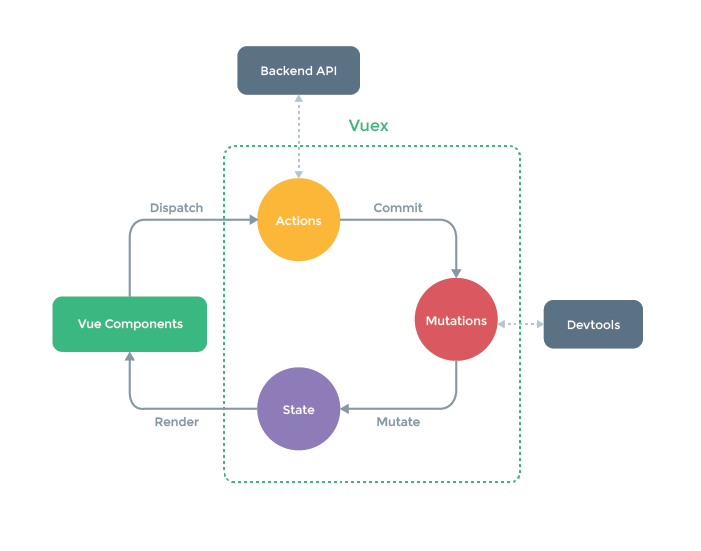
Vuex is a state management pattern + library for Vue.js applications. It serves as a centralized store for all the components in an application, with rules ensuring that the state can only be mutated in a predictable fashion. It also integrates with Vue’s official devtools extension to provide advanced features such as zero-config time-travel debugging and state snapshot export / import.
What is a “State Management Pattern”?
Let’s start with a simple Vue counter app:
new Vue({
  // state
  data () {
    return {
      count: 0
    }
  },
  // view
  template: `
    <div>{{ count }}</div>
  `,
  // actions
  methods: {
    increment () {
      this.count++
    }
  }
})
It is a self-contained app with the following parts:
- The state, the source of truth that drives our app;
- The view, a declarative mapping of the state;
- The actions, the possible ways the state could change in reaction to user inputs from the view.
This is a simple representation of the concept of “one-way data flow”:

However, the simplicity quickly breaks down when we have multiple components that share a common state:
- Multiple views may depend on the same piece of state.
- Actions from different views may need to mutate the same piece of state.
For problem one, passing props can be tedious for deeply nested components, and simply doesn’t work for sibling components. For problem two, we often find ourselves resorting to solutions such as reaching for direct parent/child instance references or trying to mutate and synchronize multiple copies of the state via events. Both of these patterns are brittle and quickly lead to unmaintainable code.
So why don’t we extract the shared state out of the components, and manage it in a global singleton? With this, our component tree becomes a big “view”, and any component can access the state or trigger actions, no matter where they are in the tree!
By defining and separating the concepts involved in state management and enforcing rules that maintain independence between views and states, we give our code more structure and maintainability.
This is the basic idea behind Vuex, inspired by Flux, Redux and The Elm Architecture. Unlike the other patterns, Vuex is also a library implementation tailored specifically for Vue.js to take advantage of its granular reactivity system for efficient updates.
If you want to learn Vuex in an interactive way you can check out this Vuex course on Scrimba, which gives you a mix of screencast and code playground that you can pause and play around with anytime.
When Should I Use It?
Vuex helps us deal with shared state management with the cost of more concepts and boilerplate. It’s a trade-off between short term and long term productivity.
If you’ve never built a large-scale SPA and jump right into Vuex, it may feel verbose and daunting. That’s perfectly normal – if your app is simple, you will most likely be fine without Vuex. A simple store pattern may be all you need. But if you are building a medium-to-large-scale SPA, chances are you have run into situations that make you think about how to better handle state outside of your Vue components, and Vuex will be the natural next step for you. There’s a good quote from Dan Abramov, the author of Redux:
Flux libraries are like glasses: you’ll know when you need them.
Getting Started
At the center of every Vuex application is the store. A “store” is basically a container that holds your application state. There are two things that make a Vuex store different from a plain global object:
- Vuex stores are reactive. When Vue components retrieve state from it, they will reactively and efficiently update if the store’s state changes.
- You cannot directly mutate the store’s state. The only way to change a store’s state is by explicitly committing mutations. This ensures every state change leaves a track-able record, and enables tooling that helps us better understand our applications.
The Simplest Store
NOTE: We will be using ES2015 syntax for code examples for the rest of the docs. If you haven’t picked it up, you should!
After installing Vuex, let’s create a store. It is pretty straightforward – just provide an initial state object, and some mutations:
// Make sure to call Vue.use(Vuex) first if using a module system

const store = new Vuex.Store({
  state: {
    count: 0
  },
  mutations: {
    increment (state) {
      state.count++
    }
  }
})
Now, you can access the state object as store.state, and trigger a state change with the store.commit method:
store.commit('increment')

console.log(store.state.count) // -> 1
Again, the reason we are committing a mutation instead of changing store.state.count directly, is because we want to explicitly track it. This simple convention makes your intention more explicit, so that you can reason about state changes in your app better when reading the code. In addition, this gives us the opportunity to implement tools that can log every mutation, take state snapshots, or even perform time travel debugging.
Using store state in a component simply involves returning the state within a computed property, because the store state is reactive. Triggering changes simply means committing mutations in component methods.
Here’s an example of the most basic Vuex counter app.
Next, we will discuss each core concept in much finer details, starting with State.
State
Single State Tree
Vuex uses a single state tree – that is, this single object contains all your application level state and serves as the “single source of truth”. This also means usually you will have only one store for each application. A single state tree makes it straightforward to locate a specific piece of state, and allows us to easily take snapshots of the current app state for debugging purposes.
The single state tree does not conflict with modularity – in later chapters we will discuss how to split your state and mutations into sub modules.
The data you store in Vuex follows the same rules as the data in a Vue instance, ie the state object must be plain. See also: Vue#data.
Getting Vuex State into Vue Components
So how do we display state inside the store in our Vue components? Since Vuex stores are reactive, the simplest way to “retrieve” state from it is simply returning some store state from within a computed property:
// let's create a Counter component
const Counter = {
  template: `<div>{{ count }}</div>`,
  computed: {
    count () {
      return store.state.count
    }
  }
}
Whenever store.state.count changes, it will cause the computed property to re-evaluate, and trigger associated DOM updates.
However, this pattern causes the component to rely on the global store singleton. When using a module system, it requires importing the store in every component that uses store state, and also requires mocking when testing the component.
Vuex provides a mechanism to “inject” the store into all child components from the root component with the store option (enabled by Vue.use(Vuex)):
const app = new Vue({
  el: '#app',
  // provide the store using the "store" option.
  // this will inject the store instance to all child components.
  store,
  components: { Counter },
  template: `
    <div class="app">
      <counter></counter>
    </div>
  `
})
By providing the store option to the root instance, the store will be injected into all child components of the root and will be available on them as this.$store. Let’s update our Counter implementation:
const Counter = {
  template: `<div>{{ count }}</div>`,
  computed: {
    count () {
      return this.$store.state.count
    }
  }
}
The mapState Helper
When a component needs to make use of multiple store state properties or getters, declaring all these computed properties can get repetitive and verbose. To deal with this we can make use of the mapState helper which generates computed getter functions for us, saving us some keystrokes:
// in full builds helpers are exposed as Vuex.mapState
import { mapState } from 'vuex'

export default {
  // ...
  computed: mapState({
    // arrow functions can make the code very succinct!
    count: state => state.count,

    // passing the string value 'count' is same as `state => state.count`
    countAlias: 'count',

    // to access local state with `this`, a normal function must be used
    countPlusLocalState (state) {
      return state.count + this.localCount
    }
  })
}
We can also pass a string array to mapState when the name of a mapped computed property is the same as a state sub tree name.
computed: mapState([
  // map this.count to store.state.count
  'count'
])
Object Spread Operator
Note that mapState returns an object. How do we use it in combination with other local computed properties? Normally, we’d have to use a utility to merge multiple objects into one so that we can pass the final object to computed. However with the object spread operator (which is a stage-4 ECMAScript proposal), we can greatly simplify the syntax:
computed: {
  localComputed () { /* ... */ },
  // mix this into the outer object with the object spread operator
  ...mapState({
    // ...
  })
}
Components Can Still Have Local State
Using Vuex doesn’t mean you should put all the state in Vuex. Although putting more state into Vuex makes your state mutations more explicit and debuggable, sometimes it could also make the code more verbose and indirect. If a piece of state strictly belongs to a single component, it could be just fine leaving it as local state. You should weigh the trade-offs and make decisions that fit the development needs of your app.
Getters
Sometimes we may need to compute derived state based on store state, for example filtering through a list of items and counting them:
computed: {
  doneTodosCount () {
    return this.$store.state.todos.filter(todo => todo.done).length
  }
}
If more than one component needs to make use of this, we have to either duplicate the function, or extract it into a shared helper and import it in multiple places – both are less than ideal.
Vuex allows us to define “getters” in the store. You can think of them as computed properties for stores. Like computed properties, a getter’s result is cached based on its dependencies, and will only re-evaluate when some of its dependencies have changed.
Getters will receive the state as their 1st argument:
const store = new Vuex.Store({
  state: {
    todos: [
      { id: 1, text: '...', done: true },
      { id: 2, text: '...', done: false }
    ]
  },
  getters: {
    doneTodos: state => {
      return state.todos.filter(todo => todo.done)
    }
  }
})
Property-Style Access
The getters will be exposed on the store.getters object, and you access values as properties:
store.getters.doneTodos // -> [{ id: 1, text: '...', done: true }]
Getters will also receive other getters as the 2nd argument:
getters: {
  // ...
  doneTodosCount: (state, getters) => {
    return getters.doneTodos.length
  }
}
store.getters.doneTodosCount // -> 1
We can now easily make use of it inside any component:
computed: {
  doneTodosCount () {
    return this.$store.getters.doneTodosCount
  }
}
Note that getters accessed as properties are cached as part of Vue’s reactivity system.
Method-Style Access
You can also pass arguments to getters by returning a function. This is particularly useful when you want to query an array in the store:
getters: {
  // ...
  getTodoById: (state) => (id) => {
    return state.todos.find(todo => todo.id === id)
  }
}
store.getters.getTodoById(2) // -> { id: 2, text: '...', done: false }
Note that getters accessed via methods will run each time you call them, and the result is not cached.
The mapGetters Helper
The mapGetters helper simply maps store getters to local computed properties:
import { mapGetters } from 'vuex'

export default {
  // ...
  computed: {
    // mix the getters into computed with object spread operator
    ...mapGetters([
      'doneTodosCount',
      'anotherGetter',
      // ...
    ])
  }
}
If you want to map a getter to a different name, use an object:
...mapGetters({
  // map `this.doneCount` to `this.$store.getters.doneTodosCount`
  doneCount: 'doneTodosCount'
})
Mutations
The only way to actually change state in a Vuex store is by committing a mutation. Vuex mutations are very similar to events: each mutation has a string type and a handler. The handler function is where we perform actual state modifications, and it will receive the state as the first argument:
const store = new Vuex.Store({
  state: {
    count: 1
  },
  mutations: {
    increment (state) {
      // mutate state
      state.count++
    }
  }
})
You cannot directly call a mutation handler. Think of it more like event registration: “When a mutation with type increment is triggered, call this handler.” To invoke a mutation handler, you need to call store.commit with its type:
store.commit('increment')
Commit with Payload
You can pass an additional argument to store.commit, which is called the payload for the mutation:
// ...
mutations: {
  increment (state, n) {
    state.count += n
  }
}
store.commit('increment', 10)
In most cases, the payload should be an object so that it can contain multiple fields, and the recorded mutation will also be more descriptive:
// ...
mutations: {
  increment (state, payload) {
    state.count += payload.amount
  }
}
store.commit('increment', {
  amount: 10
})
Object-Style Commit
An alternative way to commit a mutation is by directly using an object that has a type property:
store.commit({
  type: 'increment',
  amount: 10
})
When using object-style commit, the entire object will be passed as the payload to mutation handlers, so the handler remains the same:
mutations: {
  increment (state, payload) {
    state.count += payload.amount
  }
}
Mutations Follow Vue’s Reactivity Rules
Since a Vuex store’s state is made reactive by Vue, when we mutate the state, Vue components observing the state will update automatically. This also means Vuex mutations are subject to the same reactivity caveats when working with plain Vue:
- Prefer initializing your store’s initial state with all desired fields upfront.
- When adding new properties to an Object, you should either:
- Use
Vue.set(obj, 'newProp', 123), or - Replace that Object with a fresh one. For example, using the object spread syntax we can write it like this:
state.obj = { ...state.obj, newProp: 123 }
Using Constants for Mutation Types
It is a commonly seen pattern to use constants for mutation types in various Flux implementations. This allows the code to take advantage of tooling like linters, and putting all constants in a single file allows your collaborators to get an at-a-glance view of what mutations are possible in the entire application:
// mutation-types.js
export const SOME_MUTATION = 'SOME_MUTATION'
// store.js
import Vuex from 'vuex'
import { SOME_MUTATION } from './mutation-types'

const store = new Vuex.Store({
  state: { ... },
  mutations: {
    // we can use the ES2015 computed property name feature
    // to use a constant as the function name
    [SOME_MUTATION] (state) {
      // mutate state
    }
  }
})
Whether to use constants is largely a preference – it can be helpful in large projects with many developers, but it’s totally optional if you don’t like them.
Mutations Must Be Synchronous
One important rule to remember is that mutation handler functions must be synchronous. Why? Consider the following example:
mutations: {
  someMutation (state) {
    api.callAsyncMethod(() => {
      state.count++
    })
  }
}
Now imagine we are debugging the app and looking at the devtool’s mutation logs. For every mutation logged, the devtool will need to capture a “before” and “after” snapshots of the state. However, the asynchronous callback inside the example mutation above makes that impossible: the callback is not called yet when the mutation is committed, and there’s no way for the devtool to know when the callback will actually be called – any state mutation performed in the callback is essentially un-trackable!
Committing Mutations in Components
You can commit mutations in components with this.$store.commit('xxx'), or use the mapMutations helper which maps component methods to store.commit calls (requires root store injection):
import { mapMutations } from 'vuex'

export default {
  // ...
  methods: {
    ...mapMutations([
      'increment', // map `this.increment()` to `this.$store.commit('increment')`

      // `mapMutations` also supports payloads:
      'incrementBy' // map `this.incrementBy(amount)` to `this.$store.commit('incrementBy', amount)`
    ]),
    ...mapMutations({
      add: 'increment' // map `this.add()` to `this.$store.commit('increment')`
    })
  }
}
On to Actions
Asynchronicity combined with state mutation can make your program very hard to reason about. For example, when you call two methods both with async callbacks that mutate the state, how do you know when they are called and which callback was called first? This is exactly why we want to separate the two concepts. In Vuex, mutations are synchronous transactions:
store.commit('increment')
// any state change that the "increment" mutation may cause
// should be done at this moment.
To handle asynchronous operations, let’s introduce Actions.
sa
sa
sa
sa
sa
sa
sa
sas
a