
[Fuente: https://docs.expo.io/versions/latest/guides/push-notifications]
BIG INCONVENIENT: At the moment this post writting: with EXpo there is no way of getting an unique device identifier (react-native-device-info package need detaching from Expo)
Push Notifications
Push Notifications are an important feature to, as “growth hackers” would say, retain and re-engage users and monetize on their attention, or something. From my point of view it’s just super handy to know when a relevant event happens in an app so I can jump back into it and read more. Let’s look at how to do this with Expo. Spoiler alert: it’s almost too easy.
Note: iOS and Android simulators cannot receive push notifications. To test them out you will need to use a real-life device. Additionally, when calling Permissions.askAsync on the simulator, it will resolve immediately with “undetermined” as the status, regardless of whether you choose to allow or not.
There are three main steps to wiring up push notifications:
- sending a user’s Expo Push Token to your server
- calling Expo’s Push API with the token when you want to send a notification
- and responding to receiving and/or selecting the notification in your app (for example to jump to a particular screen that the notification refers to).
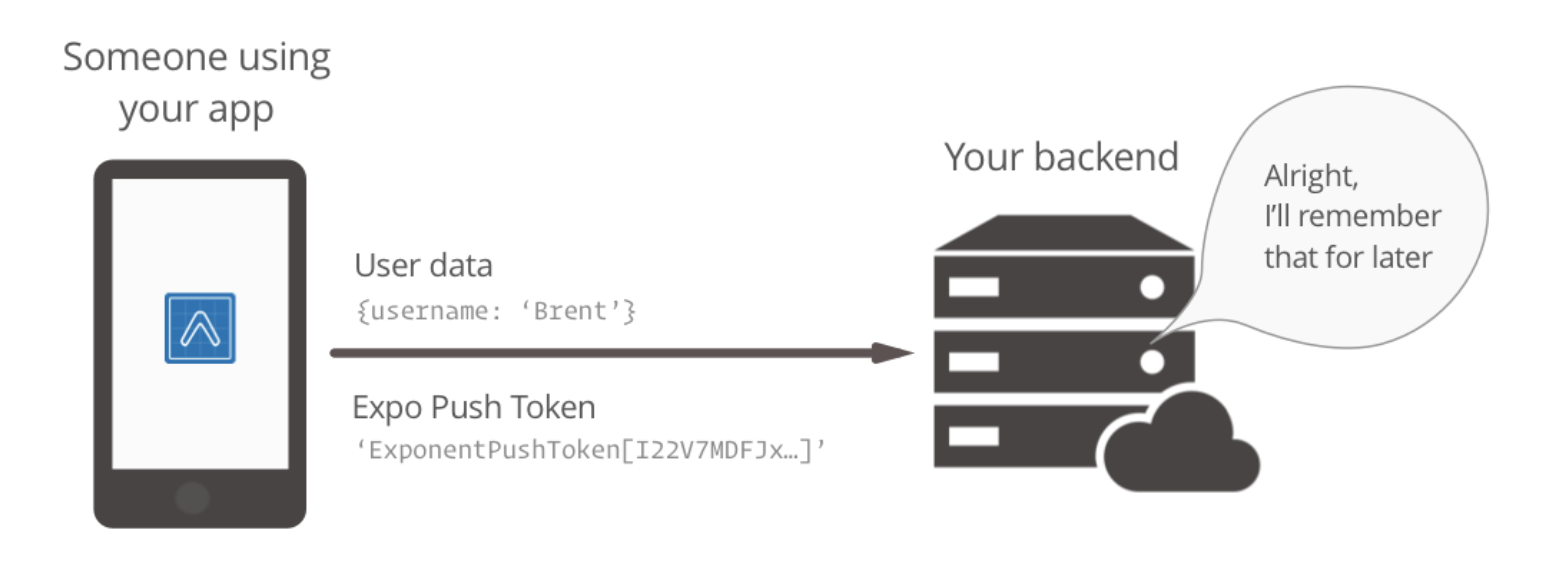
1. Save the user’s Expo Push Token on your server
In order to send a push notification to somebody, we need to know about their device. Sure, we know our user’s account information, but Apple, Google, and Expo do not understand what devices correspond to “Brent” in your proprietary user account system. Expo takes care of identifying your device with Apple and Google through the Expo push token, which is unique each time an app is installed on a device. All we need to do is send this token to your server so you can associate it with the user account and use it in the future for sending push notifications.
import { Permissions, Notifications } from 'expo';

const PUSH_ENDPOINT = 'https://your-server.com/users/push-token';

async function registerForPushNotificationsAsync() {
  const { status: existingStatus } = await Permissions.getAsync(
    Permissions.NOTIFICATIONS
  );
  let finalStatus = existingStatus;

  // only ask if permissions have not already been determined, because
  // iOS won't necessarily prompt the user a second time.
  if (existingStatus !== 'granted') {
    // Android remote notification permissions are granted during the app
    // install, so this will only ask on iOS
    const { status } = await Permissions.askAsync(Permissions.NOTIFICATIONS);
    finalStatus = status;
  }

  // Stop here if the user did not grant permissions
  if (finalStatus !== 'granted') {
    return;
  }

  // Get the token that uniquely identifies this device
  let token = await Notifications.getExpoPushTokenAsync();

  // POST the token to your backend server from where you can retrieve it to send push notifications.
  return fetch(PUSH_ENDPOINT, {
    method: 'POST',
    headers: {
      Accept: 'application/json',
      'Content-Type': 'application/json',
    },
    body: JSON.stringify({
      token: {
        value: token,
      },
      user: {
        username: 'Brent',
      },
    }),
  });
}
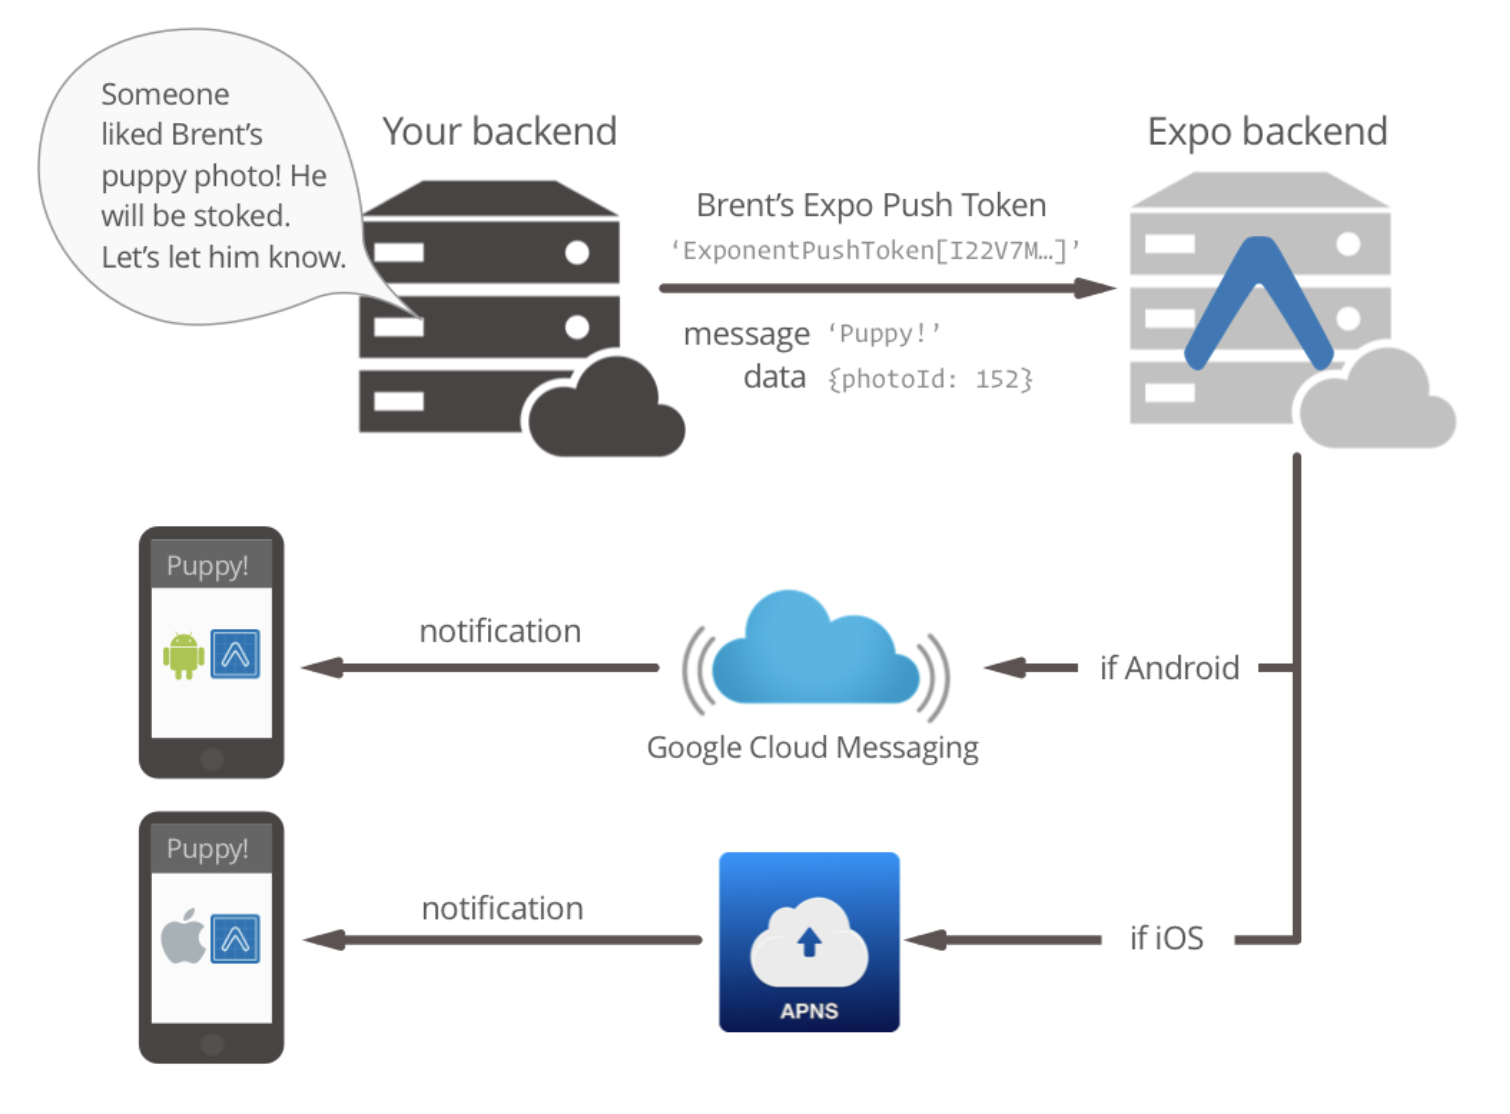
2. Call Expo’s Push API with the user’s token
Push notifications have to come from somewhere, and that somewhere is your server, probably (you could write a command line tool to send them if you wanted, it’s all the same). When you’re ready to send a push notification, grab the Expo push token off of the user record and send it over to the Expo API using a plain old HTTPS POST request. We’ve taken care of wrapping that for you in a few languages:
Using FCM for Push Notifications
Firebase Cloud Messaging is a popular option for delivering push notifications reliably and is required for all new standalone Android apps made with Expo. To set up your Expo Android app to get push notifications using your own FCM credentials, follow this guide closely.
Note that FCM is not currently available for Expo iOS apps.
Client Setup
-
If you have not already created a Firebase project for your app, do so now by clicking on Add project in the Firebase Console.
-
In your new project console, click Add Firebase to your Android app and follow the setup steps. Make sure that the Android package name you enter is the same as the value of
android.packagein your app.json. -
Download the
google-services.jsonfile and place it in your Expo app’s root directory. -
In your app.json, add an
android.googleServicesFilefield with the relative path to thegoogle-services.jsonfile you just downloaded. If you placed it in the root directory, this will probably look like
{
  ...
  "android": {
    "googleServicesFile": "./google-services.json",
    ...
  }
}expo build:android.Uploading Server Credentials
In order for Expo to send notifications from our servers using your credentials, you’ll need to upload your secret server key. You can find this key in the Firebase Console for your project:
-
At the top of the sidebar, click the gear icon to the right of Project Overview to go to your project settings.
-
Click on the Cloud Messaging tab in the Settings pane.
-
Copy the token listed next to Server key.
-
Run
expo push:android:upload --api-key <your-token-here>, replacing<your-token-here>with the string you just copied. We’ll store your token securely on our servers, where it will only be accessed when you send a push notification.
That’s it — users who run this new version of the app will now receive notifications through FCM using your project’s credentials. You just send the push notifications as you normally would (see guide). We’ll take care of choosing the correct service to send the notification.