[Fuente: https://developer.android.com/codelabs/jetpack-compose-navigation?hl=en#0]
Navigation is a Jetpack library that enables navigating from one destination within your app to another. The Navigation library also provides a specific artifact to enable consistent and idiomatic navigation with Jetpack Compose. This artifact (navigation-compose) is the focal point of this codelab.
Setup
To follow along, clone the starting point (main branch) for the codelab.
$ git clone https://github.com/android/codelab-android-compose.git
Alternatively, you can download two zip files:
Now that you’ve downloaded the code, open the NavigationCodelab project folder in Android Studio. You’re now ready to get started.
The compose-codelabs repo contains starter code for all codelabs in the pathway.
For this codelab, use the NavigationCodelab project.
 NavigationCodelab — Project that contains the start and finished code for this codelab
The project is built in multiple git branches:
- main – the starter code for this project, you will make changes to this to complete the codelab
- end – contains the solution to this codelab
Overview of the Rally app
As a first step, you should get familiar with the Rally app and its codebase. Run the app and explore it a bit.
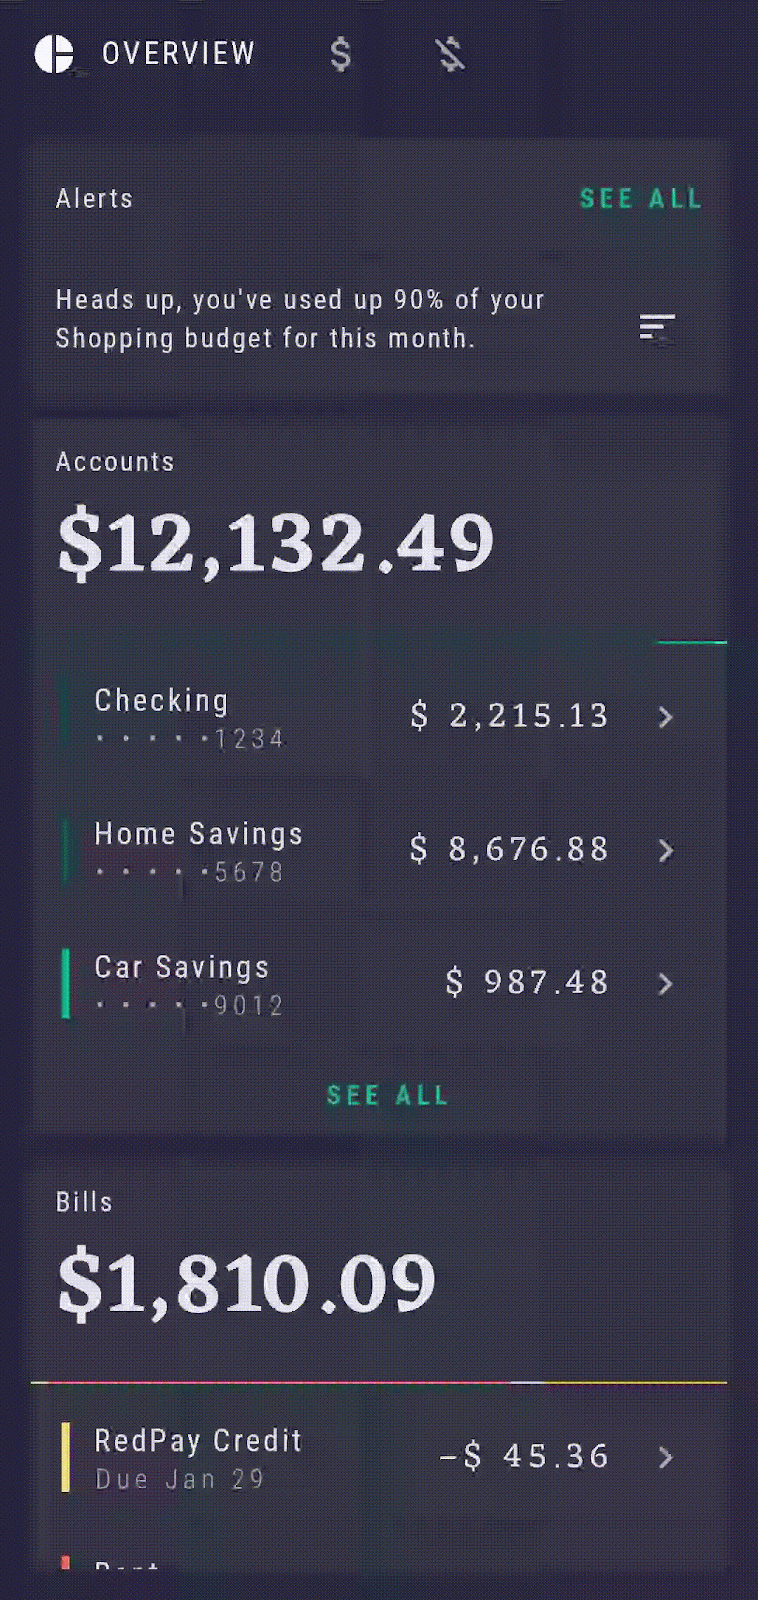
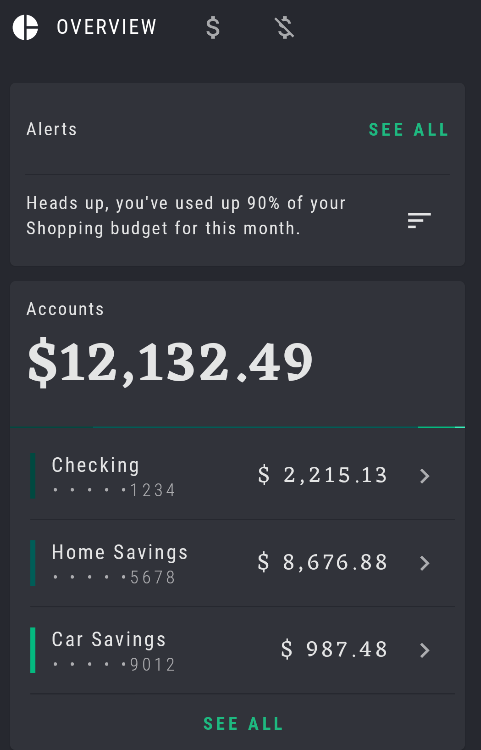
Rally has three main screens as composables:
OverviewScreen— overview of all financial transactions and alertsAccountsScreen— insights into existing accountsBillsScreen— scheduled expenses
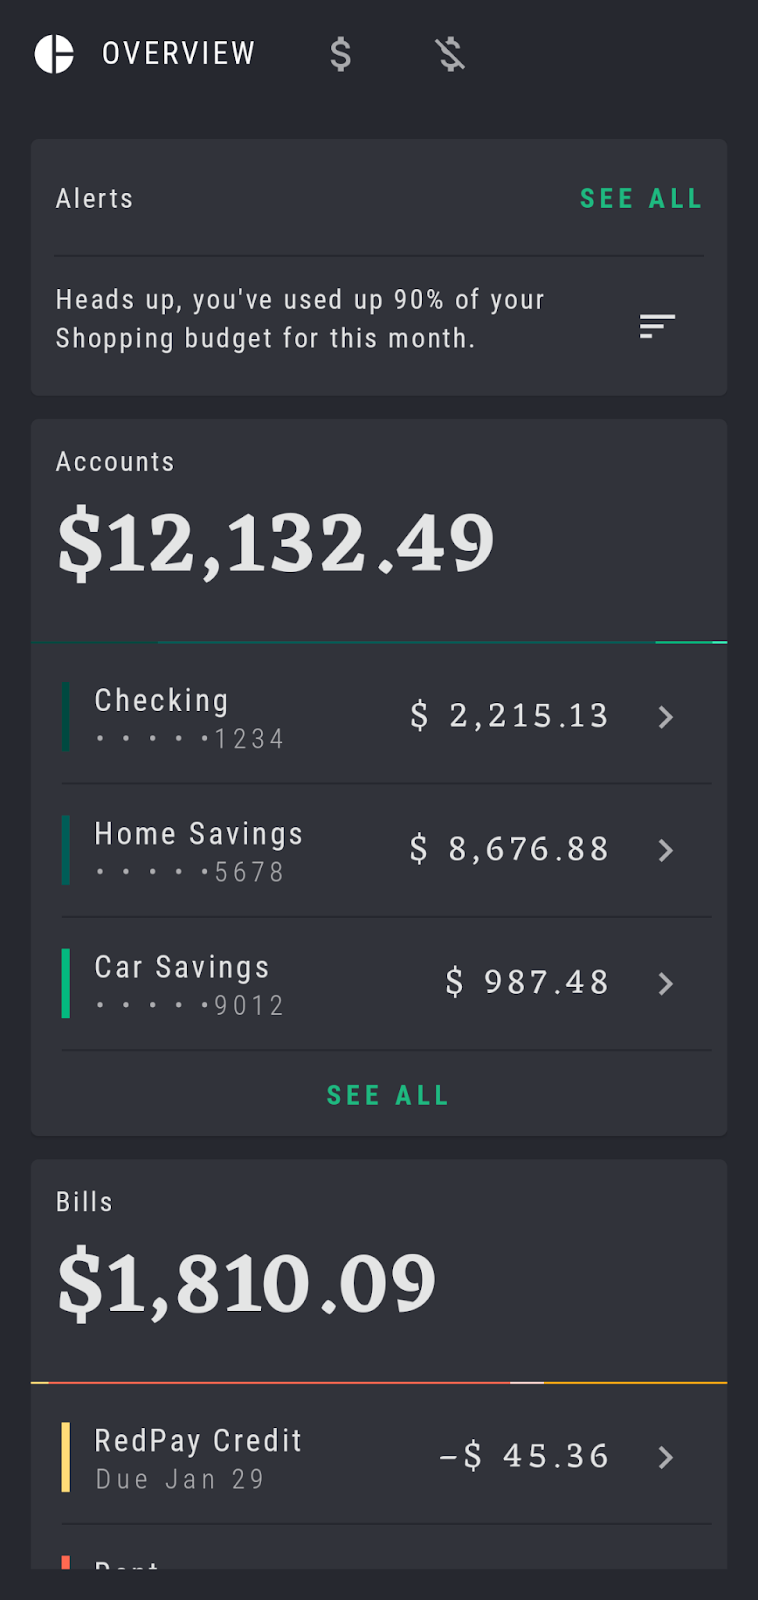 | 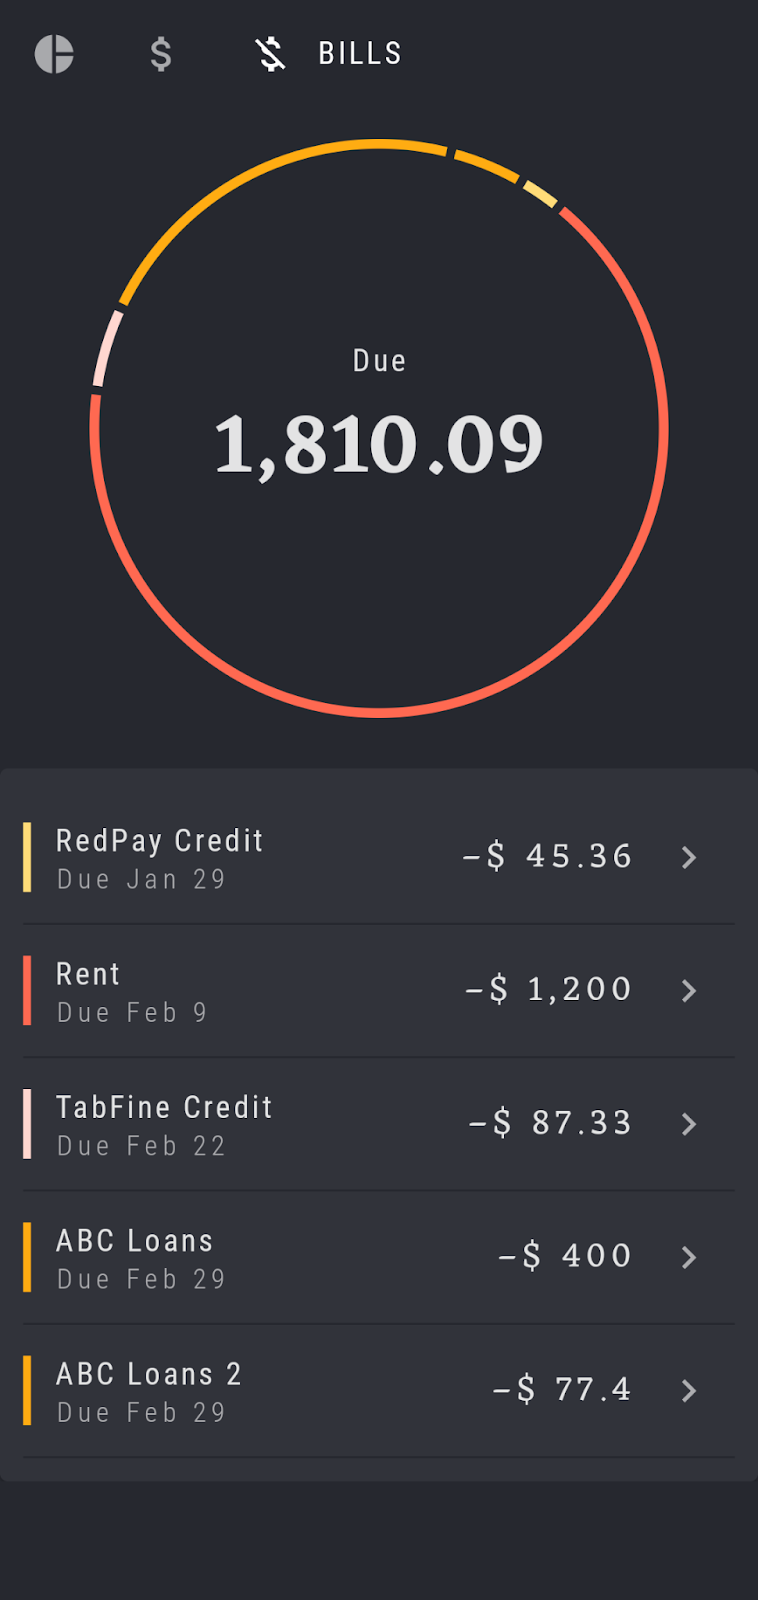 |
At the very top of the screen, Rally is using a custom tab bar composable (RallyTabRow) to navigate between these three screens. Tapping on each icon should expand the current selection and take you to its corresponding screen:


When navigating to these composable screens, you can also think of them as navigation destinations, as we want to land on each at a specific point. These destinations are predefined in the RallyDestinations.kt file.
/*
 * Copyright 2022 The Android Open Source Project
 *
 * Licensed under the Apache License, Version 2.0 (the "License");
 * you may not use this file except in compliance with the License.
 * You may obtain a copy of the License at
 *
 *     https://www.apache.org/licenses/LICENSE-2.0
 *
 * Unless required by applicable law or agreed to in writing, software
 * distributed under the License is distributed on an "AS IS" BASIS,
 * WITHOUT WARRANTIES OR CONDITIONS OF ANY KIND, either express or implied.
 * See the License for the specific language governing permissions and
 * limitations under the License.
 */

package com.example.compose.rally

import androidx.compose.material.icons.Icons
import androidx.compose.material.icons.filled.AttachMoney
import androidx.compose.material.icons.filled.Money
import androidx.compose.material.icons.filled.MoneyOff
import androidx.compose.material.icons.filled.PieChart
import androidx.compose.runtime.Composable
import androidx.compose.ui.graphics.vector.ImageVector
import com.example.compose.rally.ui.accounts.AccountsScreen
import com.example.compose.rally.ui.accounts.SingleAccountScreen
import com.example.compose.rally.ui.bills.BillsScreen
import com.example.compose.rally.ui.overview.OverviewScreen

/**
 * Contract for information needed on every Rally navigation destination
 */
interface RallyDestination {
    val icon: ImageVector
    val route: String
    val screen: @Composable () -> Unit
}

/**
 * Rally app navigation destinations
 */
object Overview : RallyDestination {
    override val icon = Icons.Filled.PieChart
    override val route = "overview"
    override val screen: @Composable () -> Unit = { OverviewScreen() }
}

object Accounts : RallyDestination {
    override val icon = Icons.Filled.AttachMoney
    override val route = "accounts"
    override val screen: @Composable () -> Unit = { AccountsScreen() }
}

object Bills : RallyDestination {
    override val icon = Icons.Filled.MoneyOff
    override val route = "bills"
    override val screen: @Composable () -> Unit = { BillsScreen() }
}

object SingleAccount : RallyDestination {
    // Added for simplicity, this icon will not in fact be used, as SingleAccount isn't
    // part of the RallyTabRow selection
    override val icon = Icons.Filled.Money
    override val route = "single_account"
    override val screen: @Composable () -> Unit = { SingleAccountScreen() }
    const val accountTypeArg = "account_type"
}

// Screens to be displayed in the top RallyTabRow
val rallyTabRowScreens = listOf(Overview, Accounts, Bills)
Inside, you will find all three main destinations defined as objects (Overview, Accounts and Bills) as well as a SingleAccount, which will be added to the app later. Each object extends from the RallyDestination interface and contains the necessary information on each destination for navigation purposes:
- An
iconfor the top bar - A String
route(which is necessary for the Compose Navigation as a path that leads to that destination) - A
screenrepresenting the entire composable for this destination
When you run the app, you will notice that you can actually navigate between the destinations currently using the top bar. However, the app isn’t in fact using Compose Navigation, but instead its current navigation mechanism is relying on some manual switching of composables and triggering recomposition to show the new content. Therefore, the goal of this codelab is to successfully migrate and implement Compose Navigation.
The basic migration to Jetpack Compose follows several steps:
- Add the latest Compose Navigation dependency
- Set up the
NavController - Add a
NavHostand create the navigation graph - Prepare routes for navigating between different app destinations
- Replace the current navigation mechanism with Compose Navigation
Let’s cover these steps one by one, in more detail.
Open the app’s build file, found at app/build.gradle. In the dependencies section, add the navigation-compose dependency.
dependencies {
  implementation "androidx.navigation:navigation-compose:{latest_version}"
  // ...
}
You can find the latest version of navigation-compose here.
Now, sync the project and you’re ready to start using Navigation in Compose.
The NavController is the central component when using Navigation in Compose. It keeps track of back stack composable entries, moves the stack forward, enables back stack manipulation, and navigates between destination states. Because NavController is central to navigation, it has to be created as a first step in setting up Compose Navigation.
A NavController is obtained by calling the rememberNavController() function. This creates and remembers a NavController which survives configuration changes (using rememberSaveable).
Note: This codelab will not explain the basics of state management in Compose. If you need to learn more about this, consider reading through State and Jetpack Compose documentation or taking the State in Jetpack Compose codelab.
You should always create and place the NavController at the top level in your composable hierarchy, usually within your App composable. Then, all composables that need to reference the NavController have access to it. This follows the principles of state hoisting and ensures the NavController is the main source of truth for navigating between composable screens and maintaining the back stack.
Open RallyActivity.kt. Fetch the NavController by using rememberNavController() within RallyApp, as it is the root composable and the entry point for the entire application:
import androidx.navigation.compose.rememberNavController
// ...

@Composable
fun RallyApp() {
    RallyTheme {
        var currentScreen: RallyDestination by remember { mutableStateOf(Overview) }
        val navController = rememberNavController()
        Scaffold(
            // ...
        ) {
            // ...
       }
}As previously mentioned, Rally App has three main destinations and one additional to be added later (SingleAccount). These are defined in RallyDestinations.kt. and we mentioned that each destination has a defined icon, route and screen.
The next step is to add these destinations to your navigation graph, with Overview as the start destination when the app is launched.
When using Navigation within Compose, each composable destination in your navigation graph is associated with a route. Routes are represented as Strings that define the path to your composable and guide your navController to land on the right place. You can think of it as an implicit deep link that leads to a specific destination. Each destination must have a unique route.
To accomplish this, we’ll use the route property of each RallyDestination object. For example, Overview.route is the route that will take you to the Overview screen composable.
The next step is to add a NavHost and create your navigation graph.
The 3 main parts of Navigation are the NavController, NavGraph, and NavHost.
The NavController is always associated with a single NavHost composable. The NavHost acts as a container and is responsible for displaying the current destination of the graph. As you navigate between composables, the content of the NavHost is automatically recomposed. It also links the NavController with a navigation graph ( NavGraph) that maps out the composable destinations to navigate between. It is essentially a collection of fetchable destinations.
Go back to the RallyApp composable in RallyActivity.kt. Replace the Box composable inside the Scaffold, which contains the current screen’s contents for manual switching of the screens, with a new NavHost that you can create by following the code example below.
Pass in the navController we created in the previous step to hook it up to this NavHost. As mentioned previously, each NavController must be associated with a single NavHost.
The NavHost also needs a startDestination route to know which destination to show when the app is launched, so set this to Overview.route. Additionally, pass a Modifier to accept the outer Scaffold padding and apply it to the NavHost.
The final parameter builder: NavGraphBuilder.() -> Unit is responsible for defining and building the navigation graph. It uses the lambda syntax from the Navigation Kotlin DSL, so it can be passed as a trailing lambda inside the body of the function and pulled out of the parentheses:
import androidx.navigation.compose.NavHost
...

fun RallyApp() {
    RallyTheme {
        var currentScreen: RallyDestination by remember { mutableStateOf(Overview) }
        val navController = rememberNavController()
        Scaffold(
            topBar = {
                RallyTabRow(
                    allScreens = rallyTabRowScreens,
                    onTabSelected = { screen -> currentScreen = screen },
                    currentScreen = currentScreen
                )
            }
        ) { innerPadding ->

            NavHost(
                navController = navController,
                startDestination = Overview.route,
                modifier = Modifier.padding(innerPadding)
            ) {

                // Add more destinations similarly.
            }

        }
    }
}Now, you can define your navigation graph and the destinations that the NavController can navigate to. As mentioned, the builder parameter expects a function, so Navigation Compose provides the NavGraphBuilder.composable extension function to easily add individual composable destinations to the navigation graph and define the necessary navigation information.
The first destination will be Overview, so you need to add it via the composable extension function and set its unique String route. This just adds the destination to your nav graph, so you also need to define the actual UI to be displayed when you navigate to this destination. This will also be done via a trailing lambda inside the body of the composable function, a pattern that is frequently used in Compose:
import androidx.navigation.compose.composable
// ...

NavHost(
    navController = navController,
    startDestination = Overview.route,
    modifier = Modifier.padding(innerPadding)
) {
    composable(route = Overview.route) {
        Overview.screen()
    }
}
Following this pattern, we’ll add all three main screen composables as three destinations:
NavHost(
    navController = navController,
    startDestination = Overview.route,
    modifier = Modifier.padding(innerPadding)
) {
    composable(route = Overview.route) {
        Overview.screen()
    }
    composable(route = Accounts.route) {
        Accounts.screen()
    }
    composable(route = Bills.route) {
        Bills.screen()
    }
}
Now run the app – you will see the Overview as the start destination and its corresponding UI shown.
We mentioned before a custom top tab bar, RallyTabRow composable, that previously handled the manual navigation between the screens. At this point, it’s not yet connected with the new navigation, so you can verify that clicking on the tabs won’t change the destination of the displayed screen composable. Let’s fix that next!
In this step, you’ll wire up the RallyTabRow with the navController and the navigation graph to enable it to navigate to the correct destinations.
To do this, you need to use your new navController to define the correct navigation action for the RallyTabRow‘s onTabSelected callback. This callback defines what should happen when a specific tab icon is selected and performs the navigation action via navController.navigate(route).
Note: To make your code testable and reusable, it is advised not to pass the entire navController to your composables directly. Instead, you should always provide callbacks that define the exact navigation actions you wish to trigger.
Following this guidance, in RallyActivity, find the RallyTabRow composable and its callback parameter onTabSelected.
Since we want the tab to navigate to a specific destination when tapped, you also need to know which exact tab icon was selected. Luckily, onTabSelected: (RallyDestination) -> Unit parameter provides this already. You will use that information and the RallyDestination route to guide your navController and call navController.navigate(newScreen.route) when a tab is selected:
@Composable
fun RallyApp() {
    RallyTheme {
        var currentScreen: RallyDestination by remember { mutableStateOf(Overview) }
        val navController = rememberNavController()
        Scaffold(
            topBar = {
                RallyTabRow(
                    allScreens = rallyTabRowScreens,
                    // Pass the callback like this,
                    // defining the navigation action when a tab is selected:
                    onTabSelected = { newScreen ->
                        navController.navigate(newScreen.route)
                    },
                    currentScreen = currentScreen,
                )
            }
If you run the app now, you can verify that tapping on individual tabs in RallyTabRow does indeed navigate to the correct composable destination. However, there are currently two issues you might have noticed:
- Retapping the same tab in a row launches the multiple copies of the same destination
- The tab’s UI is not matching the correct destination shown – meaning, the expanding and collapsing of selected tabs isn’t working as intended:
Let’s fix both!
Launching a single copy of a destination
To fix the first issue and make sure there will be at most one copy of a given destination on the top of the back stack, Compose Navigation API provides a launchSingleTop flag you can pass to your navController.navigate() action, like this:
navController.navigate(route) { launchSingleTop = true }
Since you want this behavior across the app, for every destination, instead of copy pasting this flag to all of your .navigate(...) calls, you can extract it into a helper extension at the bottom of your RallyActivity:
import androidx.navigation.NavHostController
// ...

fun NavHostController.navigateSingleTopTo(route: String) =
    this.navigate(route) { launchSingleTop = true }
Now you can replace the navController.navigate(newScreen.route) call with .navigateSingleTopTo(...). Rerun the app and verify you will now get only one copy of a single destination when clicking multiple times on its icon in the top bar:
@Composable
fun RallyApp() {
    RallyTheme {
        var currentScreen: RallyDestination by remember { mutableStateOf(Overview) }
        val navController = rememberNavController()
        Scaffold(
            topBar = {
                RallyTabRow(
                    allScreens = rallyTabRowScreens,
                    onTabSelected = { newScreen ->
                        navController
                            .navigateSingleTopTo(newScreen.route)
                    },
                    currentScreen = currentScreen,
                )
}Apart from launchSingleTop, there are also other flags that you can use from the NavOptionsBuilder to control and customize your navigation behavior even more. Since our RallyTabRow acts similarly to a BottomNavigation, you should also think about whether you want to save and restore a destination state when you navigate to and from it. For example, if you scroll to the bottom of Overview and then navigate to Accounts and back, do you want to keep the scroll position? Do you want to re-tap on the same destination in the RallyTabRow to reload your screen state or not? These are all valid questions and should be determined by the requirements of your own app design.
We will cover some additional options that you can use within the same navigateSingleTopTo extension function:
launchSingleTop = true– as mentioned, this makes sure there will be at most one copy of a given destination on the top of the back stack- In Rally app, this would mean that re-tapping the same tab multiple times doesn’t launch multiple copies of the same destination
popUpTo(startDestination) { saveState = true }– pop up to the start destination of the graph to avoid building up a large stack of destinations on the back stack as you select tabs- In Rally, this would mean that pressing the back arrow from any destination would pop the entire back stack to Overview
restoreState = true– determines whether this navigation action should restore any state previously saved byPopUpToBuilder.saveStateor thepopUpToSaveStateattribute. Note that, if no state was previously saved with the destination ID being navigated to, this has no effect- In Rally, this would mean that, re-tapping the same tab would keep the previous data and user state on the screen without reloading it again
You can add all of these options one by one to the code, run the app after each and verify the exact behavior after adding each flag. That way, you’ll be able to see in practice how each flag changes the navigation and back stack state:
import androidx.navigation.NavHostController
import androidx.navigation.NavGraph.Companion.findStartDestination
// ...

fun NavHostController.navigateSingleTopTo(route: String) =
    this.navigate(route) {
        popUpTo(
            this@navigateSingleTopTo.graph.findStartDestination().id
        ) {
            saveState = true
        }
        launchSingleTop = true
        restoreState = true
}
Note: If you need more guidance on managing multiple back stacks, take a look at the documentation on supporting multiple backstacks.
Fixing the tab UI
At the very start of the codelab, while still using the manual navigation mechanism, RallyTabRow was using the currentScreen variable to determine whether to expand or collapse each tab.
However, after the changes you’ve made, currentScreen will no longer be updated. This is why expanding and collapsing of selected tabs inside the RallyTabRow doesn’t work anymore.
To re-enable this behavior using Compose Navigation, you need to know at each point what is the current destination shown, or in navigation terms, what is the top of your current back stack entry, and then update your RallyTabRow every time this changes.
To get real time updates on your current destination from the back stack in a form of State, you can use navController.currentBackStackEntryAsState() and then grab its current destination:
Note: This codelab will not explain the basics of state management in Compose. If you need to learn more about this, consider reading through State and Jetpack Compose documentation or taking the State in Jetpack Compose codelab.
import androidx.navigation.compose.currentBackStackEntryAsState
import androidx.compose.runtime.getValue
// ...

@Composable
fun RallyApp() {
    RallyTheme {
        val navController = rememberNavController()

        val currentBackStack by navController.currentBackStackEntryAsState()
        // Fetch your currentDestination:
        val currentDestination = currentBackStack?.destination
        // ...
    }
}
currentBackStack?.destination returns NavDestination.To properly update the currentScreen again, you need to find a way of matching the return NavDestination with one of Rally’s three main screen composables. You must determine which one is currently shown so that you can then pass this information to the RallyTabRow. As mentioned previously, each destination has a unique route, so we can use this String route as an ID of sorts to do a verified comparison and find a unique match.
To update the currentScreen, you need to iterate through the rallyTabRowScreens list to find a matching route and then return the corresponding RallyDestination. Kotlin provides a handy .find() function for that:
import androidx.navigation.compose.currentBackStackEntryAsState
import androidx.compose.runtime.getValue
// ...

@Composable
fun RallyApp() {
    RallyTheme {
        val navController = rememberNavController()

        val currentBackStack by navController.currentBackStackEntryAsState()
        val currentDestination = currentBackStack?.destination

        // Change the variable to this and use Overview as a backup screen if this returns null
        val currentScreen = rallyTabRowScreens.find { it.route == currentDestination?.route } ?: Overview
        // ...
    }
}
Since currentScreen is already being passed to the RallyTabRow, you can run the app and verify the tab bar UI is now being updated accordingly.
Note: At this point, the back behavior navigation is supported as well for free, through the Navigation Component. You don’t have to do any additional setup for it. Switching between the destinations and then pressing the back button will result in popping the back stack correctly and bringing you to the previous destination.
Extracting screen composables from RallyDestinations
Until now, for simplicity, we were using the screen property from the RallyDestination interface and the screen objects extending from it, to add the composable UI in the NavHost (RallyActivity.kt):
import com.example.compose.rally.ui.overview.OverviewScreen
// ...

NavHost(
    navController = navController,
    startDestination = Overview.route,
    modifier = Modifier.padding(innerPadding)
) {
    composable(route = Overview.route) {
        Overview.screen()
    }
    // ...
}
However, the following steps in this codelab (such as click events) require passing additional information to your composable screens directly. In a production environment, there will certainly be even more data that would need to be passed.
The correct- and cleaner!- way of achieving this would be to add the composables directly in the NavHost navigation graph and extract them from the RallyDestination. After that, RallyDestination and the screen objects would only hold navigation-specific information, like the icon and route, and would be decoupled from anything Compose UI related.
Open RallyDestinations.kt. Extract each screen’s composable from the screen parameter of RallyDestination objects and into the corresponding composable functions in your NavHost, replacing the previous .screen() call, like this:
import com.example.compose.rally.ui.accounts.AccountsScreen
import com.example.compose.rally.ui.bills.BillsScreen
import com.example.compose.rally.ui.overview.OverviewScreen
// ...

NavHost(
    navController = navController,
    startDestination = Overview.route,
    modifier = Modifier.padding(innerPadding)
) {
    composable(route = Overview.route) {
        OverviewScreen()
    }
    composable(route = Accounts.route) {
        AccountsScreen()
    }
    composable(route = Bills.route) {
        BillsScreen()
    }
}
At this point you can safely remove the screen parameter from RallyDestination and its objects:
interface RallyDestination {
    val icon: ImageVector
    val route: String
}

/**
 * Rally app navigation destinations
 */
object Overview : RallyDestination {
    override val icon = Icons.Filled.PieChart
    override val route = "overview"
}
// ...
Run the app again and verify that everything is still working as before. Now that you’ve completed this step, you’ll be able to set up click events inside your composable screens.
Enable clicks on OverviewScreen
Currently, any click events in your OverviewScreen are ignored. This means that the Accounts and Bills subsection “SEE ALL” buttons are clickable, but do not in fact take you anywhere. The goal of this step is to enable navigation for these click events.

OverviewScreen composable can accept several functions as callbacks to set as click events, which, for this case, should be navigation actions taking you to AccountsScreen or BillsScreen. Let’s pass these navigation callbacks to onClickSeeAllAccounts and onClickSeeAllBills to navigate to relevant destinations.
Open RallyActivity.kt, find OverviewScreen within NavHost and pass navController.navigateSingleTopTo(...) to both navigation callbacks with the corresponding routes:
OverviewScreen(
    onClickSeeAllAccounts = {
        navController.navigateSingleTopTo(Accounts.route)
    },
    onClickSeeAllBills = {
        navController.navigateSingleTopTo(Bills.route)
    }
)
The navController will now have sufficient information, like the route of the exact destination,to navigate to the right destination on a button click. If you look at the implementation of OverviewScreen, you will see that these callbacks are already being set to the corresponding onClick parameters:
@Composable
fun OverviewScreen(...) {
    // ...
    AccountsCard(
        onClickSeeAll = onClickSeeAllAccounts,
        onAccountClick = onAccountClick
    )
    // ...
    BillsCard(
        onClickSeeAll = onClickSeeAllBills
    )
}
As mentioned previously, keeping the navController at the top level of your navigation hierarchy and hoisted to the level of your App composable (instead of passing it directly into, for example, OverviewScreen) makes it easy to preview, reuse and test OverviewScreen composable in isolation – without having to rely on an actual or mocked navController instances. Passing callbacks instead also allows quick changes to your click events!
Let’s add some new functionality to our Accounts and Overview screens! Currently, these screens display a list of several different types of accounts – “Checking”, “Home Savings” etc.

However, clicking on these account types doesn’t do anything (yet!). Let’s fix this! When we tap on each account type, we want to show a new screen with the full account details. To do so, we need to provide additional information to our navController about which exact account type we’re clicking on. This can be done via arguments.
Arguments are a very powerful tool that make navigation routing dynamic by passing one or more arguments to a route. It enables displaying different information based on the different arguments provided.
Note: A named argument is defined by appending it to routes inside curly braces, like this: {argument}. It is a syntax that looks similar to Kotlin’s String template syntax, using the dollar sign, if necessary, to escape variable names, like: ${argument}
In RallyApp, add a new destination SingleAccountScreen, which will handle displaying these individual accounts, to the graph by adding a new composable function to the existing NavHost:
import com.example.compose.rally.ui.accounts.SingleAccountScreen
// ...

NavHost(
    navController = navController,
    startDestination = Overview.route,
    modifier = Modifier.padding(innerPadding)
) {
    ...
    composable(route = SingleAccount.route) {
        SingleAccountScreen()
    }
}
Set up the SingleAccountScreen landing destination
When you land on SingleAccountScreen, this destination would require additional information to know which exact account type it should display when opened. We can use arguments to pass this kind of information. You need to specify that its route additionally requires an argument {account_type}. If you take a look at the RallyDestination and its SingleAccount object, you will notice that this argument has already been defined for you to use, as an accountTypeArg String.
To pass the argument alongside your route when navigating, you need to append them together, following a pattern: "route/{argument}". In your case, that would look like this: "${SingleAccount.route}/{${SingleAccount.accountTypeArg}}". Remember that $ sign is used to escape variables:
import androidx.navigation.NavType
import androidx.navigation.compose.navArgument
// ...

composable(
    route =
        "${SingleAccount.route}/{${SingleAccount.accountTypeArg}}"
) {
    SingleAccountScreen()
}
This will ensure that, when an action is triggered to navigate to SingleAccountScreen, an accountTypeArg argument must be passed as well, otherwise the navigation will be unsuccessful. Think of it as a signature or a contract that needs to be followed by other destinations that want to navigate to SingleAccountScreen.
Note: To make your code safer and handle any edge cases, you can also set default values to arguments and specify their type explicitly.
Second step to this is to make this composable aware that it should accept arguments. You do that by defining its arguments parameter. You could define as many arguments as you need, as the composable function by default accepts a list of arguments. In your case, you just need to add a single one called accountTypeArg and add some additional safety by specifying it as type String. If you don’t set a type explicitly, it will be inferred from the default value of this argument:
import androidx.navigation.NavType
import androidx.navigation.compose.navArgument
// ...

composable(
    route =
        "${SingleAccount.route}/{${SingleAccount.accountTypeArg}}",
    arguments = listOf(
        navArgument(SingleAccount.accountTypeArg) { type = NavType.StringType }
    )
) {
    SingleAccountScreen()
}
This would work perfectly and you could choose to keep the code like this. However, since all of our destination specific information is in RallyDestinations.kt and its objects, let’s continue using the same approach (just as we did above for Overview, Accounts,and Bills) and move this list of arguments into SingleAccount:
object SingleAccount : RallyDestination {
    // ...
    override val route = "single_account"
    const val accountTypeArg = "account_type"
    val arguments = listOf(
        navArgument(accountTypeArg) { type = NavType.StringType }
    )
}
Replace the previous arguments with SingleAccount.arguments now back into the NavHost corresponding composable. This also ensures we keep the NavHost as clean and readable as possible:
composable(
    route = "${SingleAccount.route}/{${SingleAccount.accountTypeArg}}",
    arguments =  SingleAccount.arguments
) {
    SingleAccountScreen()
}
Now that you’ve defined your complete route with arguments for SingleAccountScreen, the next step is to make sure this accountTypeArg is passed down further to the SingleAccountScreen composable, so that it knows which account type to display correctly. If you look at the implementation of the SingleAccountScreen, you will see that it’s already set up and waiting to accept an accountType parameter:
fun SingleAccountScreen(
    accountType: String? = UserData.accounts.first().name
) {
   // ...
}
To recap, so far:
- You’ve made sure we define the route to request arguments, as a signal to its preceding destinations
- You made sure that the
composableknows it needs to accept arguments
Our final step is to actually retrieve the passed argument value somehow.
In Compose Navigation, each NavHost composable function has access to the current NavBackStackEntry – a class which holds the information on the current route and passed arguments of an entry in the back stack. You can use this to get the required arguments list from navBackStackEntry and then search and retrieve the exact argument you need, to pass it down further to your composable screen.
In this case, you will request accountTypeArg from the navBackStackEntry. Then, you need to pass it down further to SingleAccountScreen's accountType parameter.
You also could provide a default value for the argument, as a placeholder, in case it has not been provided and make your code ever safer by covering this edge case.
Your code should now look like this:
NavHost(...) {
    // ...
    composable(
        route =
          "${SingleAccount.route}/{${SingleAccount.accountTypeArg}}",
        arguments = SingleAccount.arguments
    ) { navBackStackEntry ->
        // Retrieve the passed argument
        val accountType =
            navBackStackEntry.arguments?.getString(SingleAccount.accountTypeArg)

        // Pass accountType to SingleAccountScreen
        SingleAccountScreen(accountType)
    }
}
Now your SingleAccountScreen has the necessary information to display the correct account type when you navigate to it. If you look at the implementation of SingleAccountScreen, you can see that it already does the matching of the passed accountType to the UserData source to fetch the corresponding account details.
Let’s do one minor optimization task again and move the "${SingleAccount.route}/{${SingleAccount.accountTypeArg}}" route as well into RallyDestinations.kt and its SingleAccount object:
object SingleAccount : RallyDestination {
    // ...
    override val route = "single_account"
    const val accountTypeArg = "account_type"
    val routeWithArgs = "${route}/{${accountTypeArg}}"
    val arguments = listOf(
        navArgument(accountTypeArg) { type = NavType.StringType }
    )
}
And again, replace it in the corresponding NavHost composable:
// ...
composable(
    route = SingleAccount.routeWithArgs,
    arguments = SingleAccount.arguments
) {...}
Setup the Accounts and Overview starting destinations
Now that you’ve defined your SingleAccountScreen route and the argument it requires and accepts to make a successful navigation to SingleAccountScreen, you need to make sure that the same accountTypeArg argument is being passed from the previous destination (meaning, whichever destination you’re coming from).
As you can see, there are two sides to this – the starting destination that provides and passes an argument and the landing destination that accepts that argument and uses it to display the correct information. Both need to be defined explicitly.
As an example, when you’re on the Accounts destination and you tap on “Checking” account type, the Accounts destination needs to pass a “Checking” String as an argument, appended to the “single_account” String route, to successfully open the corresponding SingleAccountScreen. Its String route would look like this: "single_account/Checking"
You would use this exact same route with the passed argument when using the navController.navigateSingleTopTo(...), like this:
navController.navigateSingleTopTo("${SingleAccount.route}/$accountType").
Pass this navigation action callback to the onAccountClick parameter of OverviewScreen and AccountsScreen. Note that these parameters are predefined as: onAccountClick: (String) -> Unit, with String as input. This means that, when the user taps on a specific account type in Overview and Account, that account type String will already be available to you and can easily be passed as an nav argument:
OverviewScreen(
    // ...
    onAccountClick = { accountType ->
        navController
          .navigateSingleTopTo("${SingleAccount.route}/$accountType")
    }
)
// ...

AccountsScreen(
    // ...
    onAccountClick = { accountType ->
        navController
          .navigateSingleTopTo("${SingleAccount.route}/$accountType")
    }
)
To keep things readable, you could extract this navigation action into a private helper, extension function:
import androidx.navigation.NavHostController
// ...
OverviewScreen(
    // ...
    onAccountClick = { accountType ->
        navController.navigateToSingleAccount(accountType)
    }
)

// ...

AccountsScreen(
    // ...
    onAccountClick = { accountType ->
        navController.navigateToSingleAccount(accountType)
    }
)

// ...

private fun NavHostController.navigateToSingleAccount(accountType: String) {
    this.navigateSingleTopTo("${SingleAccount.route}/$accountType")
}
When you run the app at this point, you’re able to click on each account type and will be taken to its corresponding SingleAccountScreen, displaying data for the given account.